

Student Management System in C# Windows Forms With Source Code
Last Updated: 2023-02-01 09:39:44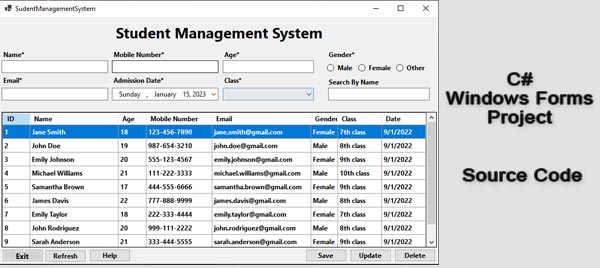
Student Management System is one of the most common projects in C# windows forms. Using C# windows forms you can easily create a simple student management system project. So This post will learn us how to create a simple student management system project using C# windows forms. You can also download the complete source code for your practice.
What is WinForm Student Management System
WinForms (Windows Forms) is a graphical user interface (GUI) class library included with Microsoft .NET Framework, providing a platform to write rich client applications for desktop, laptop, and tablet PCs. A student management system is a software application for education establishments to manage student data. Student information systems provide capabilities for registering students in courses, documenting grading, transcripts, results of student tests and other assessment scores, building student schedules, tracking student attendance, and managing many other student-related data needs in a school. So a WinForms Student Management System is a desktop application built using the WinForms framework and designed to help educational institutions manage their student records. You can also learn the technique from the Student Management System In C Programming project.
Where we will store students' information?
The student information is stored in a SQL Server database table, which is a popular choice for storing structured data in a Windows application. SQL Server is a powerful and reliable relational database management system that can handle large amounts of data and provide fast query performance. By using a SQL Server table to store student information, you can easily retrieve and manipulate the data using standard SQL commands, as well as use built-in features like indexing and constraints to ensure data integrity and consistency. Additionally, the use of a SQL Server table allows for easy integration with other parts of the student management system, such as reporting and analysis tools.
So we will store the following information about a student:
- Name
- Gender
- Age
- Phone Number
- Class
- Admission Date
Feature of Student Management System in C# Windows Forms
Our target is to learn how to develop a project using C# windows form, So this will be a simple project and we will only focus on the student entity. Hence it will be a simple CRUD (create, read, update, delete) application that allows users to store and manage information about students.
- View student information: The student management system includes a data grid view that displays all of the information about the students that have been entered into the system. This allows users to quickly and easily view and compare information about multiple students.
- Add new student information: Users can input and store information about new students, including name, email, mobile number, class, admission date, gender, and age.
- Edit/Update student information: Users can update any information about a student that has been previously entered into the system.
- Search Student Information: Users can search student information by the student's name.
- Delete students: Users can delete students from the system if they are no longer enrolled.
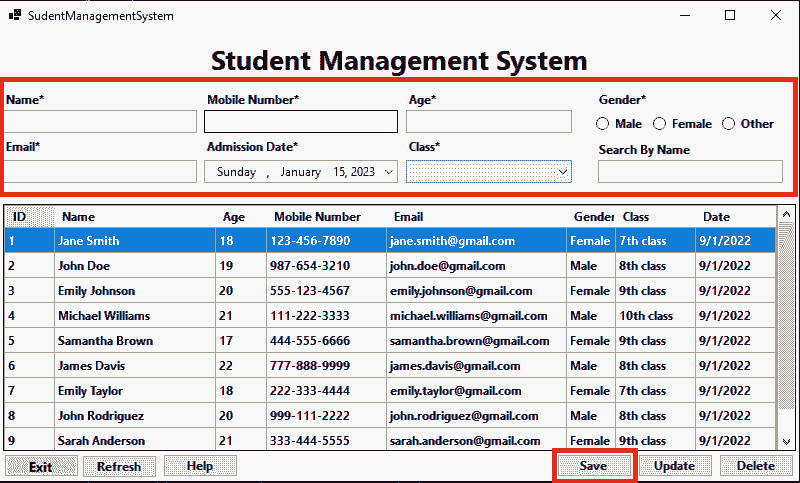
Add new student information
To add information Frist we need to design the input form. For the design form, we use Textbox, Label, ComboBox, DateTime picker, button, and Radio buttons tools. It's not that hard to design see our design below,
Here is an example of a method for storing student information in C# Windows Forms application using SQL Server database:
private void StoreStudent(string name, string email, string mobileNumber,string studentClass, DateTime admissionDate, string gender, int age)
{
   // Connect to the database
   string connectionString = "Server=localhost;Database=studentdb;User Id=user;Password=password";
   using (SqlConnection connection = new SqlConnection(connectionString))
   {
       connection.Open();
       // Create a SQL command to insert the student data into the database
       string sql = "INSERT INTO students (name, email, mobile_number, class, admission_date, gender, age) VALUES (@name, @email, @mobileNumber, @class, @admissionDate, @gender, @age)";
       using (SqlCommand command = new SqlCommand(sql, connection))
       {
           // Add the parameters and their values to the command
           command.Parameters.AddWithValue("@name", name);
           command.Parameters.AddWithValue("@email", email);
           command.Parameters.AddWithValue("@mobileNumber", mobileNumber);
           command.Parameters.AddWithValue("@class", studentClass);
           command.Parameters.AddWithValue("@admissionDate", admissionDate);
           command.Parameters.AddWithValue("@gender", gender);
           command.Parameters.AddWithValue("@age", age);
           // Execute the command
           command.ExecuteNonQuery();
       }
   }
}
Please download the complete source code for a better understanding. Also, you can watch the video.
This method takes in the student data as arguments and stores it in a database table called "students". It starts by establishing a connection to the database using the SqlConnection class and the specified connection string. The connection string includes information about the server, database name, and authentication credentials.
Next, it creates a SqlCommand object with an INSERT statement and the necessary parameters. The INSERT statement is used to add a new row to the "students" table, and the parameters represent the values to be inserted. The SqlCommand class allows you to execute a command against a database connection.
Finally, the method calls the ExecuteNonQuery method on the SqlCommand object to execute the INSERT statement. The ExecuteNonQuery method is used for statements that do not return a result set (such as INSERT, UPDATE, or DELETE), and it returns the number of rows affected by the command.
At the time of storing the student information, we will apply some basing validation rules so that you have no ability to store unnecessary and inconsequential data in our project.
Here are some validations rules we will apply in this project:
- The input fields can not be empty, for example, the name, email, and mobile number fields can not be empty.
- Student Name, email, mobile number, and address length check. for example, a mobile number cannot be greater than 20 digits or less than 11 digits
- Mobile and email must be unique.
- Must select the student class and gender
Basic validation example
Here is an example of a method for validating the attributes of a student in a .NET Windows Forms application:
private bool ValidateStudent(string name, string email, string mobileNumber, string studentClass, DateTime admissionDate, string gender, int age)
{
   // Check that the name is not empty
   if (string.IsNullOrEmpty(name))
   {
       MessageBox.Show("Please enter a name.");
       return false;
   }
   // Check that the email is in a valid format
   try
   {
       MailAddress m = new MailAddress(email);
   }
   catch (FormatException)
   {
       MessageBox.Show("Please enter a valid email address.");
       return false;
   }
   // Check that the mobile number is in a valid format
   if (!Regex.IsMatch(mobileNumber, @"^\d{10}$"))
   {
       MessageBox.Show("Please enter a valid 10-digit mobile number.");
       return false;
   }
   // Check that the class is not empty
   if (string.IsNullOrEmpty(studentClass))
   {
       MessageBox.Show("Please enter a class.");
       return false;
   }
   // Check that the gender is "Male" or "Female"
   if (!(gender == "Male" || gender == "Female"))
   {
       MessageBox.Show("Please enter a valid gender.");
       return false;
   }
   // Check that the age is a positive integer
   if (age <= 0)
   {
       MessageBox.Show("Please enter a valid age.");
       return false;
   }
   return true;
}
Please download the complete source code for a better understanding. Also, you can watch the video.
This method takes in the student data as arguments and performs various checks to ensure that the data is valid. If any of the checks fail, it displays an error message to the user using the MessageBox class and returns false. If all of the checks pass, it returns true.
The method first checks that the name and studentClass fields are not empty and that the email field is in a valid format using the MailAddress class. It then checks that a mobileNumber field is a 10-digit number using a regular expression and that the gender field is either "Male" or "Female". Finally, it checks that the age field is a positive integer.
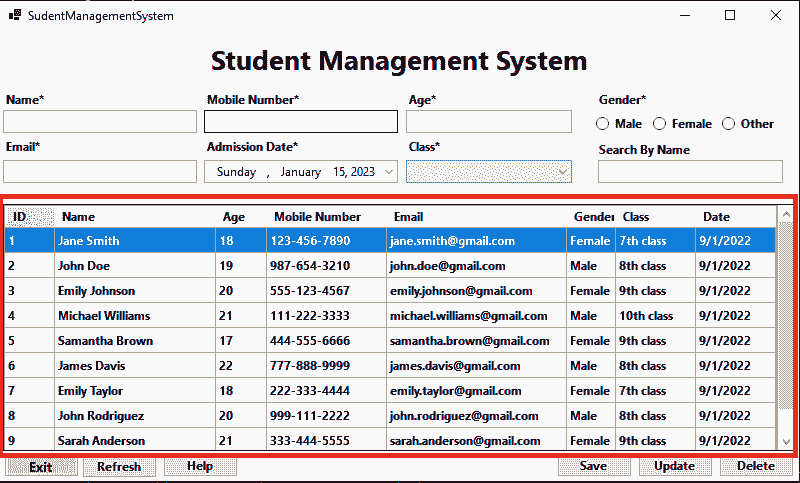
Show All Student Information
We will use the DataGridView to show student information. In our project, the student's information is shown in the photo given below:
To show all student information in a DataGridView control in a C# Windows Forms application, you can use the following steps:
- Drag and drop a ‘DataGridView’ control onto your form. This will allow you to display a table of data to the user.
- Create a method to retrieve the student data from the database and store it in a ‘DataTable’ object. Here is an example of such a method:
private DataTable GetStudentData()
{
   // Create a new DataTable object
   DataTable studentData = new DataTable();
   // Connect to the database
   string connectionString = "Server=localhost;Database=studentdb;User Id=user;Password=password";
   using (SqlConnection connection = new SqlConnection(connectionString))
   {
       connection.Open();
       // Create a SQL command to select all students from the database
       string sql = "SELECT * FROM students";
       using (SqlCommand command = new SqlCommand(sql, connection))
       {
           // Execute the command and store the result in a DataTable
           SqlDataAdapter adapter = new SqlDataAdapter(command);
           adapter.Fill(studentData);
       }
   }
   return studentData;
}
Please download the complete source code for a better understanding. Also, you can watch the video.
This method establishes a connection to the database, creates a ‘SqlCommand’ object with a ‘SELECT’ statement to retrieve all rows from the "students" table, and executes the command using a 'SqlDataAdapter' object. The 'SqlDataAdapter' object is used to populate a ‘DataTable’ with the result set returned by the command.
- Bind the ‘DataTable’ to the ‘DataGridView’ control. To do this, you can use the ‘DataSource’ property of the ‘DataGridView’ control and set it to the ‘DataTable’ object returned by the ‘GetStudentData’ method. You can also set the ‘AutoGenerateColumns’ property to true to have the ‘DataGridView' automatically generate columns based on the structure of the 'DataTable’.
Here is an example of how to bind the DataTable to the DataGridView and display the student data:
private void ShowStudentData()
{
   // Get the student data from the database
   DataTable studentData = GetStudentData();
   // Bind the student data to the DataGridView control
   dataGridView1.DataSource = studentData;
}
You can then call the 'ShowStudentData' method to display the student data in the 'DataGridView' control. Please download the complete source code for a better understanding. Also, you can watch the video.
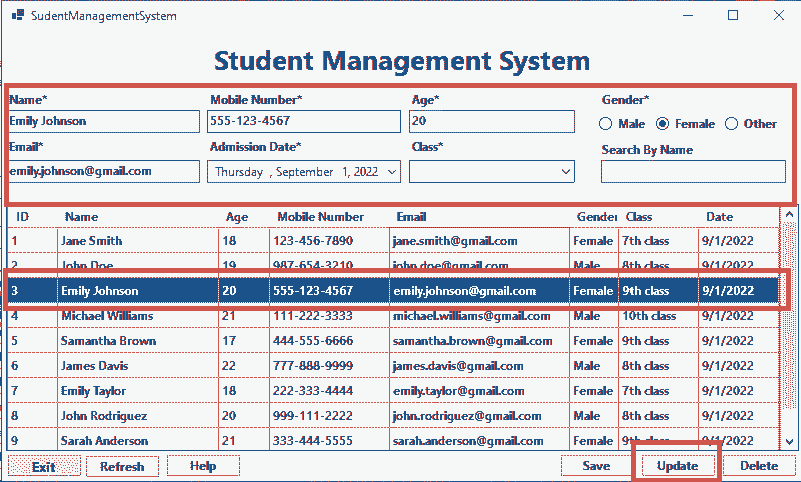
Edit/Update Student information
To keep our project simple we will use the student add a page to edit and update the student information. So to edit the student information we just need to double-click on a student's record in the DataGridView. After the double click the student form which we used to store will fill up with the existing student information that we want to edit. After finding the all existing information we can update the information easily by clicking the update button. Please note that we need to apply our validation rules here also.
Here is the example photo for the update method after double clicking on the datagridview row,
Here is an example of a method for updating student data in a C# Windows Forms application using the SQLServer database:
private void UpdateStudent(int id, string name, string email, string mobileNumber, string studentClass, DateTime admissionDate, string gender, int age)
{
   // Connect to the database
   string connectionString = "Server=localhost;Database=studentdb;User Id=user;Password=password";
   using (SqlConnection connection = new SqlConnection(connectionString))
   {
       connection.Open();
       // Create a SQL command to update the student data in the database
       string sql = "UPDATE students SET name = @name, email = @email, mobile_number = @mobileNumber, class = @class, admission_date = @admissionDate, gender = @gender, age = @age WHERE id = @id";
       using (SqlCommand command = new SqlCommand(sql, connection))
       {
           // Add the parameters and their values to the command
           command.Parameters.AddWithValue("@id", id);
           command.Parameters.AddWithValue("@name", name);
           command.Parameters.AddWithValue("@email", email);
           command.Parameters.AddWithValue("@mobileNumber", mobileNumber);
           command.Parameters.AddWithValue("@class", studentClass);
           command.Parameters.AddWithValue("@admissionDate", admissionDate);
           command.Parameters.AddWithValue("@gender", gender);
           command.Parameters.AddWithValue("@age", age);
           // Execute the command
           command.ExecuteNonQuery();
       }
   }
}
Please download the complete source code for a better understanding. Also, you can watch the video.
This method takes in the student data as arguments and updates an existing row in the "students" table of the database. It starts by establishing a connection to the database using the SqlConnection class and the specified connection string. The connection string includes information about the server, database name, and authentication credentials.
Next, it creates a 'SqlCommand' object with an UPDATE statement and the necessary parameters. The UPDATE statement is used to modify an existing row in the "students" table, and the parameters represent the new values to be set. The ‘SqlCommand’ class allows you to execute a command against a database connection.
Finally, the method calls the 'ExecuteNonQuery' method on the 'SqlCommand' object to execute the UPDATE statement. The ‘ExecuteNonQuery’ method is used for statements that do not return a result set (such as INSERT, UPDATE, or DELETE), and it returns the number of rows affected by the command.
Delete Student Information
Deleting a student's information is a very simple task you just need to select a student from DataGridview and then click on the delete button like in the picture given below.
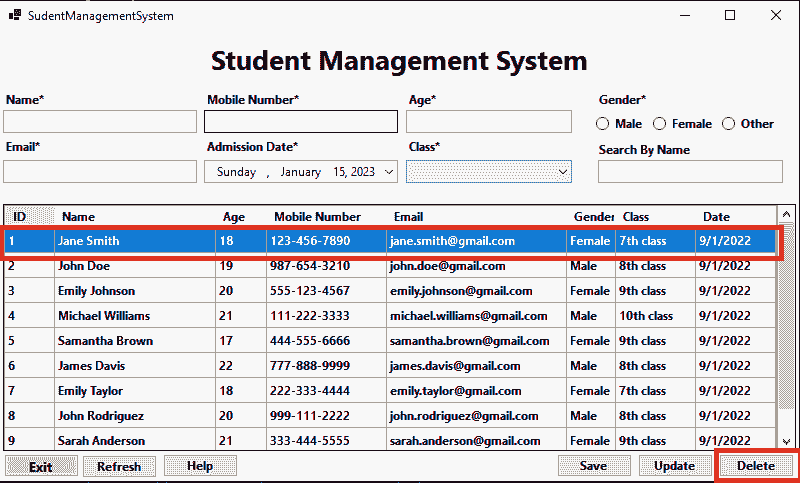
By clicking the delete button we will execute a SQL delete query using the student ID.
Here is the basic example of deleting a student from our project, you can also download the complete source code from here.
Here is an example of a method for deleting student data in a .NET Windows Forms application using a database:
private void DeleteStudent(int id)
{
   // Connect to the database
   string connectionString = "Server=localhost;Database=studentdb;User Id=user;Password=password";
   using (SqlConnection connection = new SqlConnection(connectionString))
   {
       connection.Open();
       // Create a SQL command to delete the student from the database
       string sql = "DELETE FROM students WHERE id = @id";
       using (SqlCommand command = new SqlCommand(sql, connection))
       {
           // Add the parameter and its value to the command
           command.Parameters.AddWithValue("@id", id);
           // Execute the command
           command.ExecuteNonQuery();
       }
   }
}
Please download the complete source code for a better understanding. Also, you can watch the video.
This method takes in the id of the student to be deleted as an argument and removes the corresponding row from the "students" table of the database. It starts by establishing a connection to the database using the ‘SqlConnection’ class and the specified connection string. The connection string includes information about the server, database name, and authentication credentials.
Next, it creates a ‘SqlCommand’ object with a ‘DELETE’ statement and the necessary parameter. The ‘DELETE’ statement is used to remove a row from the "students" table, and the parameter represents the id of the row to be deleted. The ‘SqlCommand’ class allows you to execute a command against a database connection.
Finally, the method calls the ‘ExecuteNonQuery’ method on the ‘SqlCommand’ object to execute the DELETE statement. The ‘ExecuteNonQuery’ method is used for statements that do not return a result set (such as INSERT, UPDATE, or DELETE), and it returns the number of rows affected by the command.
Search Student information
We will search for student information in our DataGridView so To search for student information in a C# Windows Forms application using a TextBox control and the KeyUp event, you can see the picture and follow the steps:
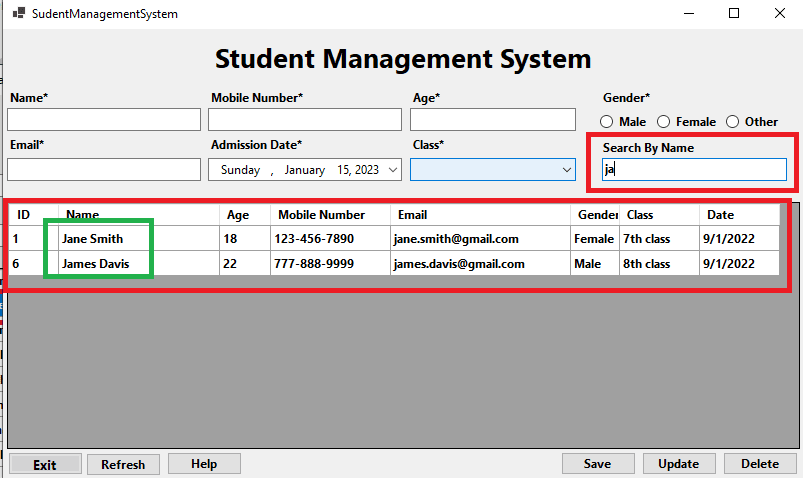
- Drag and drop a TextBox control and a DataGridView control onto your form. The TextBox control will allow the user to enter a search query, and the DataGridView control will display the search results.
- Subscribe to the KeyUp event of the TextBox control. This event is raised whenever the user releases a key while TextBox has focus. You can do this by double-clicking on the TextBox in the designer, or by adding an event handler in the form's code-behind file.
- In the event handler, create a method to search the database for students that match the search query. Here is an example of such a method:
private DataTable SearchStudents(string query)
{
   // Create a new DataTable object
   DataTable searchResults = new DataTable();
   // Connect to the database
   string connectionString = "Server=localhost;Database=studentdb;User Id=user;Password=password";
   using (SqlConnection connection = new SqlConnection(connectionString))
   {
       connection.Open();
       // Create a SQL command to search for students in the database
       string sql = "SELECT * FROM students WHERE name LIKE @query OR email LIKE @query OR mobile_number LIKE @query OR class LIKE @query";
       using (SqlCommand command = new SqlCommand(sql, connection))
       {
           // Add the parameter and its value to the command
           command.Parameters.AddWithValue("@query", "%" + query + "%");
           // Execute the command and store the result in a DataTable
           SqlDataAdapter adapter = new SqlDataAdapter(command);
           adapter.Fill(searchResults);
       }
   }
   return searchResults;
}
Please download the complete source code for a better understanding. Also, you can watch the video.
This method takes in a query string as an argument and searches the "students" table of the database for rows that match the query in the name, email, mobile_number, or class columns. It uses the LIKE operator and the % wildcard to perform a partial match. It then returns the result set as a DataTable object.
- In the KeyUp event handler, call the SearchStudents method and bind the result to the DataGridView control. To do this, you can use the DataSource property of the DataGridView control and set it to the DataTable object returned by the SearchStudents method. You can also set the AutoGenerateColumns property to true to
Future Scope
There are many ways that this project could be improved or extended in the future. Some potential features to consider adding include:
- Advanced search functionality: You could allow the user to search for students using multiple criteria, such as class, admission date, or age. You could also add a search box to the form to allow the user to enter the search term.
- Student attendance tracking: You could add a feature to track student attendance by allowing the user to mark students as present or absent for each class. You could also generate reports or charts to visualize attendance data over time.
- Student grades and transcripts: You could add a feature to store student grades for different classes or assignments and generate transcripts or report cards. You could also allow the user to enter grades using a grid or spreadsheet-like interface.
- Course management: You could add a feature to manage courses offered by the school, including the course schedule, instructor information, and enrolment data. You could also allow the user to register students for courses and generate class lists.
- Parent Portal: You could add a feature to allow parents to access student information and update their contact details. You could also allow parents to view attendance and grade data for their children.
Here are some Best Student Management System Examples.
Conclusion
In this project, we have discussed the implementation of a student management system using .NET Windows Forms and a database. We have covered various aspects of the project, including storing student data, validating input, displaying data in a DataGridView control, updating data, and deleting data. We have also discussed techniques for searching for data in a DataGridView control.
Still you face problems, feel free to contact with me, I will try my best to help you.

Kamrul Hasan
Like to learn and share programming skills(HTML, CSS, Bootstrap, javaScript, C#, SQL).