How to run SQL Server database on Apple MacBook M2 Silicon
Last Updated: 2024-03-06 08:32:21If you are using an Apple MacBook with having M2 Silicon chip and want to run SQL Server Database on your MacBook this post is for you. In this post, I will explain step by step how can you run an SQL server on your M2 machine. So let's start.
Before I start let me give you some bad news, There is no SSMS application for Mac users. Which means you need to use another application to run an SQL server. Luckily, Microsoft has another application called Azure Data Studio which has a Mac version. We can use the Azure Data Studio to run the SQL Server script. Also, you already know that the SQL server is running on a Windows machine. So, you also need another technology to run the SQL server on your Mac. To resolve this problem we will use a docker image.
Steps need to be followed to run the SQL server on the MacBook
Here are the steps you need to follow to run the SQL server on your MacBook.
- Install Docker on your MacBook
- Install Azure Data Studio on your MacBook
- Download the SQL Server image from DockerHub
- Create Database User
- Connect Database and run queries
Install Docker on your MacBook for SQL Server
Installing Docker on your MacBook is easy, You just need to go to the official website and download the Docker Version for your MacBook M2. After installing the Docker make sure your Docker resources match the SQL server requirement. SQL servers need at least 1GB of memory to run the SQL server. But you can set a CUP limit to at least 4 and a Memory limit at least 4GMB.
Install Azure Data Studio on your MacBook
Installing Azure Data Studio is also an easy task. You just need to go to the official site and download the application. After Downloading the application you can simply install the application.
Download the SQL server image from Hocker Hub.
In this step, you need to Download the SQL server Docker Image from the Docker Hub. You can follow this link to download the image. In this link, you will find a Docker Image for SQL serve which is created by MicroSoft. So you need to pull that image using the following command. Open the terminal and run the following command. After running this command an image for the SQL server will download on your machine.
docker pull mcr.microsoft.com/azure-sql-edge
Create SQL Server Database User
This is the most critical step to run an SQL server on your MacBook. You need to carefully create an SQL Server User. You need this user to connect your local database to the Azure Data Studio. You also need to set and password for that user. Also, You need to agree with Microsoft's Terms and Conditions.
docker run -e "ACCEPT_EULA=Y" -e "MSSQL_SA_PASSWORD=Nasir123" -e "MSSQL_PID=Developer" -e "MSSQL_USER=SA" -p 1433:1433 -d --name=sql mcr.microsoft.com/azure-sql-edgeHere,
- "ACCEPT_EULA=Y”
- ACCEPT_EULA=Y means you agree with the Licensing Terms
- "MSSQL_SA_PASSWORD=Nasir123”
- Nasir123 is your password
- "MSSQL_PID=Developer”
- You are using the Developer edition
- "MSSQL_USER=SA”
- SA is your username
Please Note that
- You can follow the official documentation.
- Make sure you use double quotes, when you copy and paste the command make sure your double quotes are not italic.
Connect to the local database
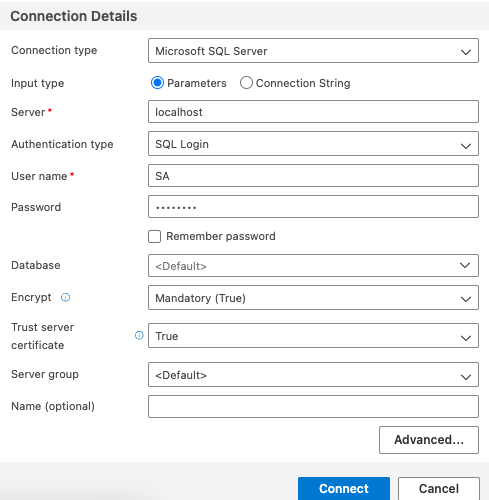
Open your Azure data studio and try to create a connection using your Username and Password.
- Server Name: localhost
- User Name: SA
- Password: Nasir123
- Encrypt: Mandatory (True)
- Trust Server Certificate: True

Still you face problems, feel free to contact with me, I will try my best to help you.

